
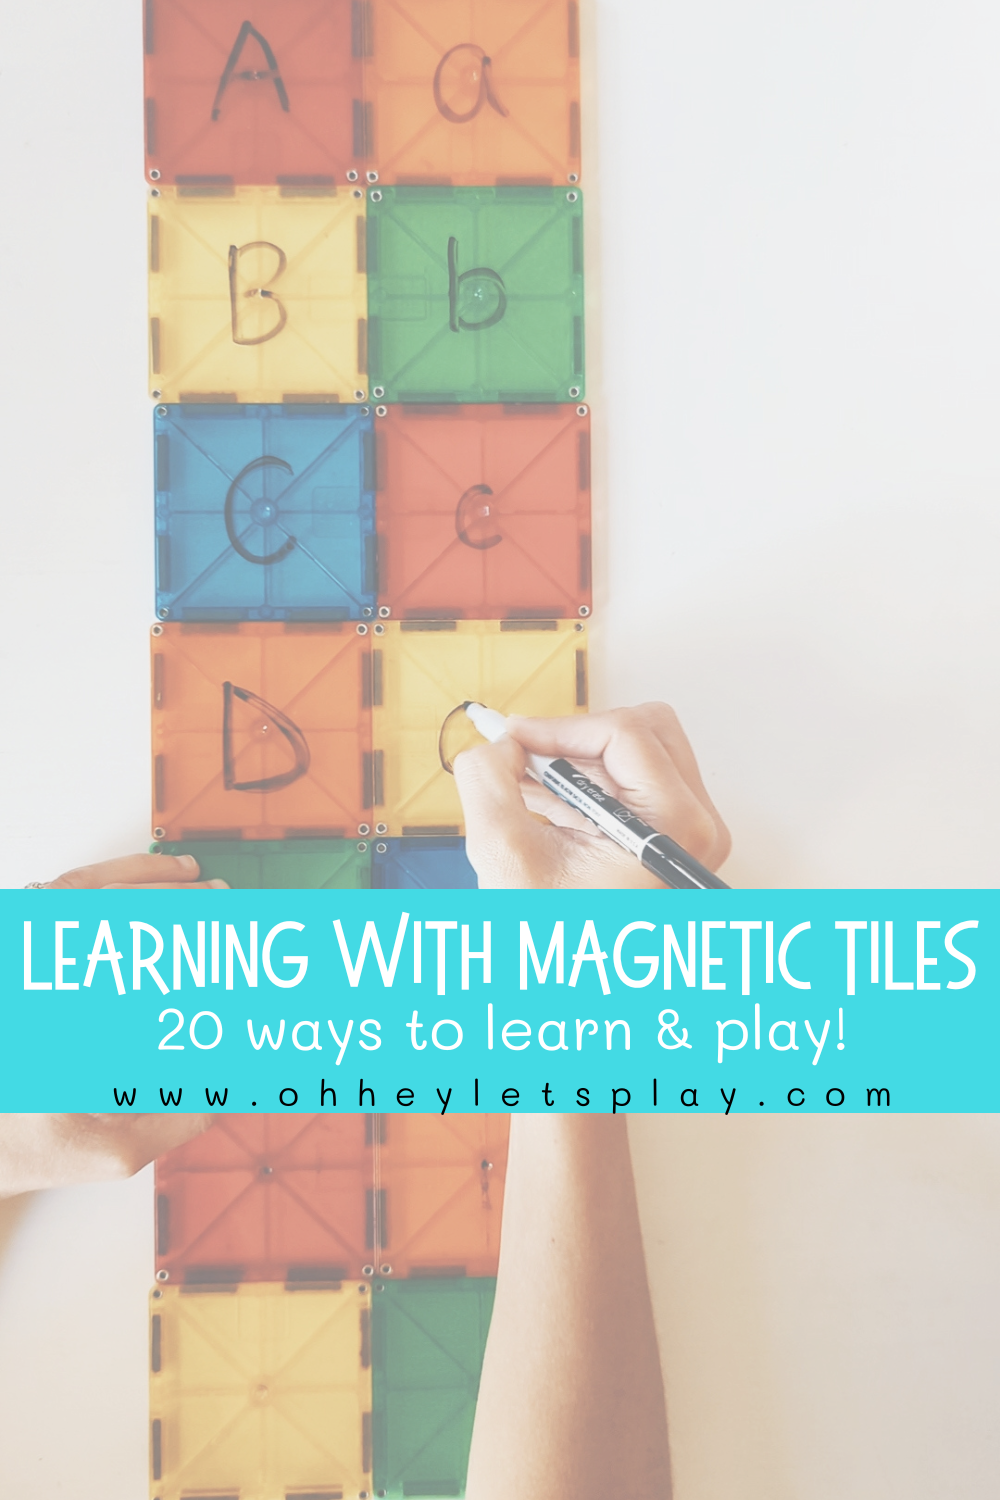
Learning with Magnetic Tiles
Magnatiles are one of the most beloved toys we have in our home. They have been played with and loved by my youngest, my oldest, my boys, my girl, and to be honest, us parents too! This is a toy that fosters the best type of open-ended, independent play through creativity, problem-solving, and cognitive development. Not only does their unique magnetic design allow for endless possibilities in constructing masterpieces, but they also serve as one of THE BEST, most versatile learning tools. The best part about using our magnatiles as a learning tool is that, because it’s such a beloved TOY, my kids still feel like they are playing, even when they are learning (one of my main goals here at Oh Hey Let’s Play)!
DISCLAIMER: THIS POST IS NOT SPONSORED OR ENDORSED BY ANY MAGNETIC TILE BRAND OR COMPANY. Magnatiles truly are just one of the most genuinely loved toys in our home, that just so happen to also make one of the best learning tools. This post does, however, contain Amazon Affiliate links, that I will earn a small commission from, if you choose to purchase through them. The support of my business in that way does not go unnoticed, and is always very appreciated.
I hope that you can find some inspiration in this post, and that your children will continue to grow in their love for learning and playing by using some of the ideas you find here!
Let’s dive in!

1) Counting & Sorting: Use magnetic tiles to introduce basic math concepts.
- Build towers or designs by grouping the magnetic tiles by color or shape and stacking them on top of each other, or connecting them on the floor.
- Depending on their age, encourage children to count how many they end up with in each group.

2) Learning Colors: Use magnetic tiles to learn color recognition and color matching.
- Place colored pieces of construction paper on the floor and have children place the matching colored tiles on top of the coordinating colored paper.
- Have children build mini, 2-D houses by encouraging them to match and connect a blue square to a blue triangle, a red square to a red triangle, and so on.
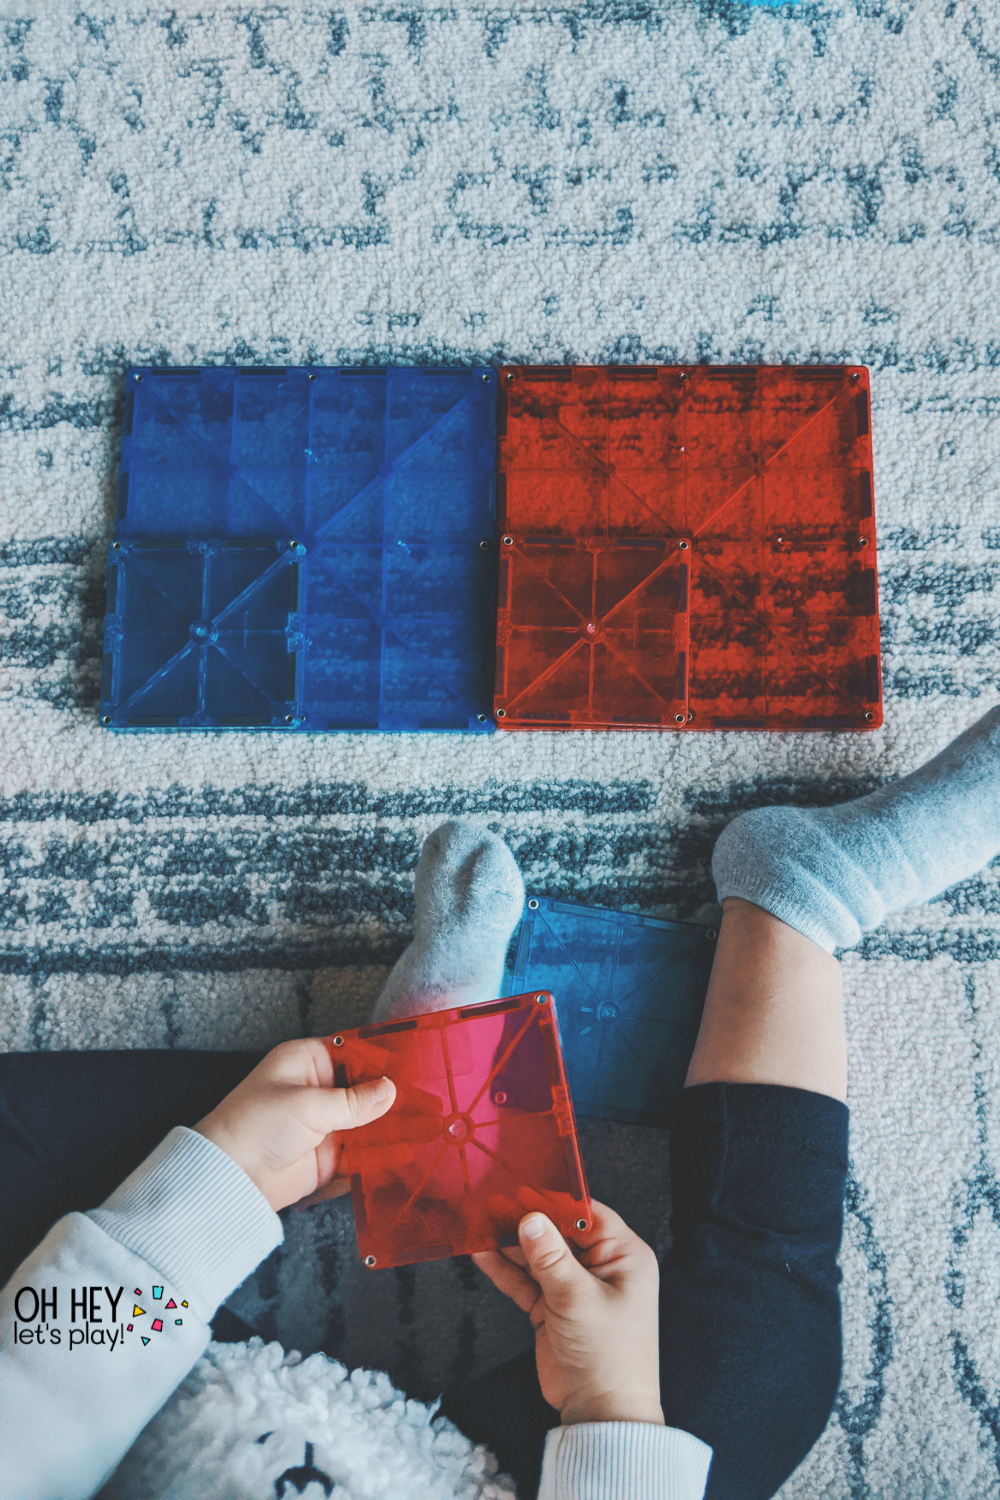
3) Mixing Colors: Use magnetic tiles to introduce the concept of mixing two colors to create a new color.
- Place two square, primary colored (red, blue, or yellow) tiles on top of one another and hold them up to the light to see what new color they make together (red + blue = purple, red + yellow = orange, blue + yellow = green).


4) Phonemic Awareness: Phonemic awareness is the ability to recognize, identify, and manipulate individual sounds in words spoken aloud. It is a very important component of early literacy development and is a foundational skill for learning to read and write BEFORE mastering any type of printed letters or words. Phonemic awareness works on being able to recognize and identify individual sounds in a word (ex: three separate sounds in the word “cat”), break words up into their individual sounds (ex: breaking the word “sun” into /s/, /u/, /n/), combine individual sounds to form a word (ex: taking three sounds /b/,/i/,/g/ and blending them to form the word “big”), and manipulating sounds in words to create new words (ex: changing the /p/ in “pig” to a /j/ to form the word “jig”). Phonemic awareness does not involve printed letters in any way, but rather focuses only on the oral sound of language.
- Set out three square magnetic tiles and say a three letter CVC word. A “CVC word” is a word that has a consonant at the beginning and the end, and a short vowel sound in the middle (ex: “dog,” “run,” or “sit”). Have children touch and connect each magnetic tile as they say the three sounds they hear.
- Work on manipulating sounds in words by setting out three tiles. Say something like “The first word is ‘pig,’ but I’m changing it to ‘dig’ - which sound did I change?” Children should be able to point to the first tile to show that the beginning sound was the one being manipulated.
5) Learning the Letters in a Child’s Name: The letters in your child’s name are the first ones they should learn. Use magnetic tiles to help learn to recognize the letters and put them in order to spell their name.
- Either write the letters on sticky notes, or colored painter’s tape and place them on the tiles, or use a dry erase marker to write directly on them (they will wipe clean with a dry tissue or cloth). Begin with all uppercase letters and write one letter on each square magnetic tile. Write each letter two times on two separate squares so that you can have one completed as an example. Connect the tiles in a straight line to spell the child’s name, and then have them use the other set to match, connect, and spell their name directly underneath the example.
- If the child’s name is “SAM,” write ‘S’ on a few square tiles, ‘A’ on a few square tiles, and ‘M’ on a few square tiles and do the same on some small triangles. Children can match the ‘S’ triangles to the ‘S’ squares to create little 2D houses, and so on with each letter.
Eventually, as they begin to master recognition of the uppercase letters, you can introduce the lowercase versions of each letter by doing the same types of activities. After that, they can start to match the uppercase letters to the lowercase letters.

6) Learning Letters: After children master the letters in their name, you can start to introduce other letters from the alphabet.
- Either use sticky notes, colored painter’s tape, or a dry erase marker to write uppercase letters on the magnetic tiles. You can use all squares to match pairs, or squares and triangles. Write each uppercase letter on 2 different magnetic tiles so that children can work on identifying, and then matching them by connecting them.
- Once you feel they have mastered most of the uppercase letters, then move on to lowercase. Once they can name all the lowercase letters, you can then start to work on matching uppercase and lowercase.

7) Identifying & Matching Shapes: Use magnetic tiles to develop early geometry skills such as naming 2D shapes, and matching them.
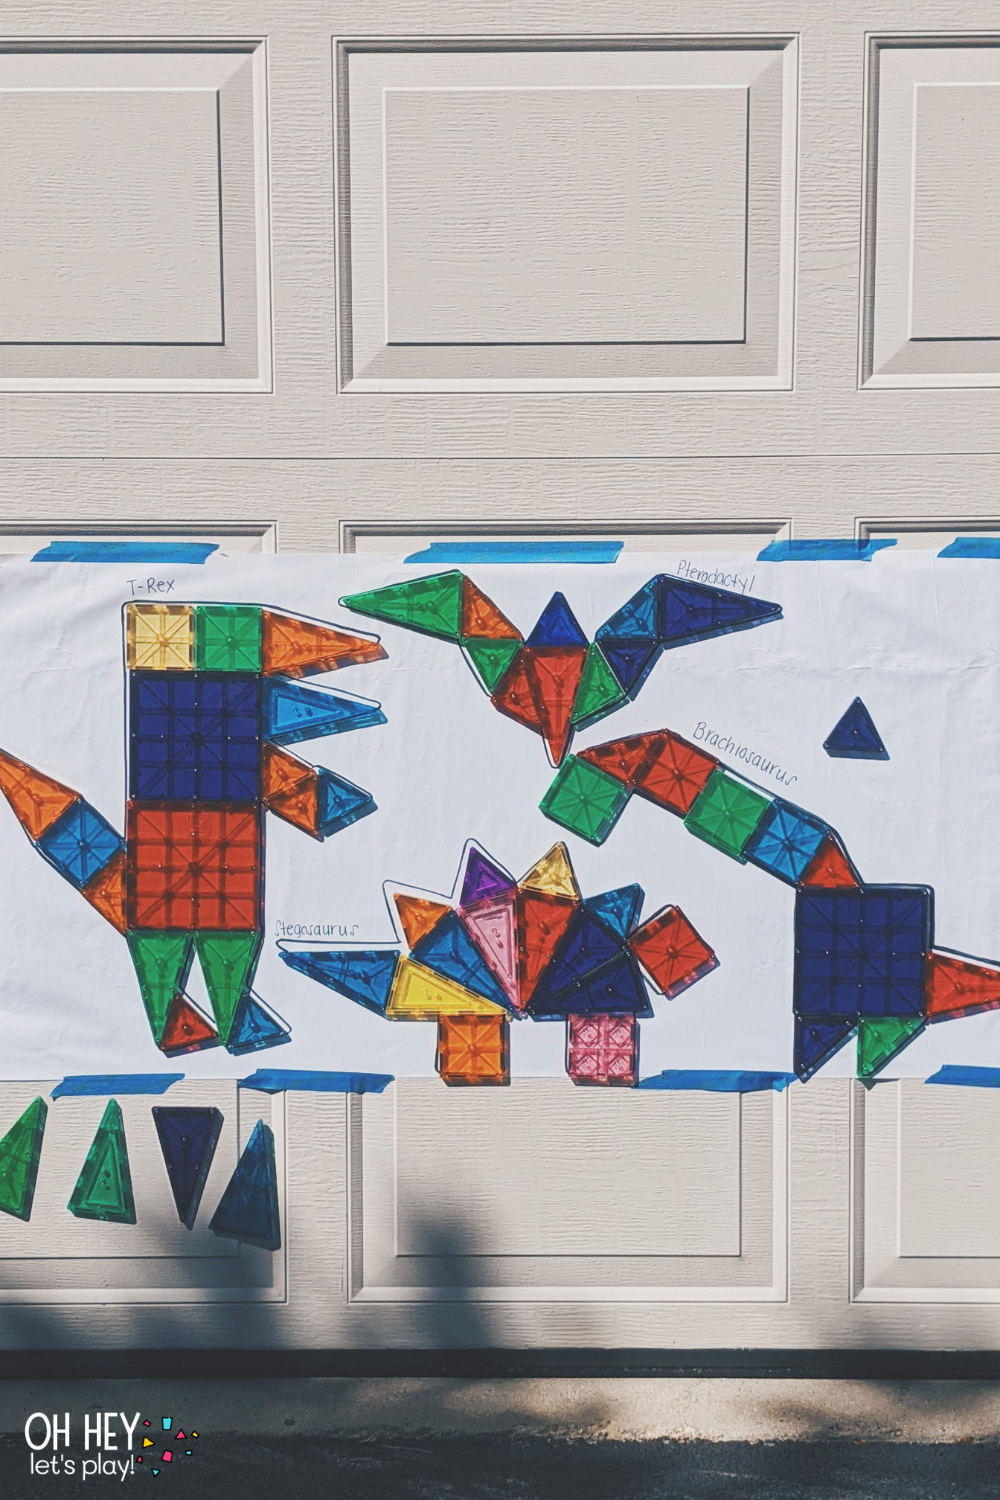
- Aside from sorting the magnetic tiles by shape and talking about the shapes as they sort, another way to work on shape identification and matching is to trace the magnetic tiles onto a large piece of white easel paper. You can tape this to the floor or a table, or take advantage of the fact that they are magnetic, and tape the paper up to your fridge (if it’s magnetic), your front door (if it’s magnetic), or even your garage door (these are usually magnetic, too) if the weather permits! Have children work on naming and matching shapes by placing them inside the shapes you traced on the paper.
- To incorporate color matching with this activity, trace the magnetic tiles in different colors so that they can not only match the shape, but also match colors. If you want to keep the focus solely on shapes, just trace them with a black sharpie or marker.
8) Matching Shapes to Create Scenes: Use magnetic tiles to create pictures and scenes while matching shapes.
- Create a design on a large piece of white paper using the magnetic tiles, and then carefully trace over the different shapes while removing each tile. Either tape the paper down to your table, or create a vertical surface by taping the paper up to a magnetic fridge, front door, or garage door (weather permitting). Children can match the magnetic tiles to the traced shapes to rebuild and recreate the scene.

9) Patterns: Use magnetic tiles to create and/or complete patterns.
- Build rows of square magnetic tiles using alternating colors to teach about an AB pattern and how a pattern is something that repeats over and over again. Create different types of patterns such as an ABB, ABBA, or add a third color and create an ABC pattern. Work on building the patterns together, start a pattern and encourage them to continue it, and see if they can create their own!
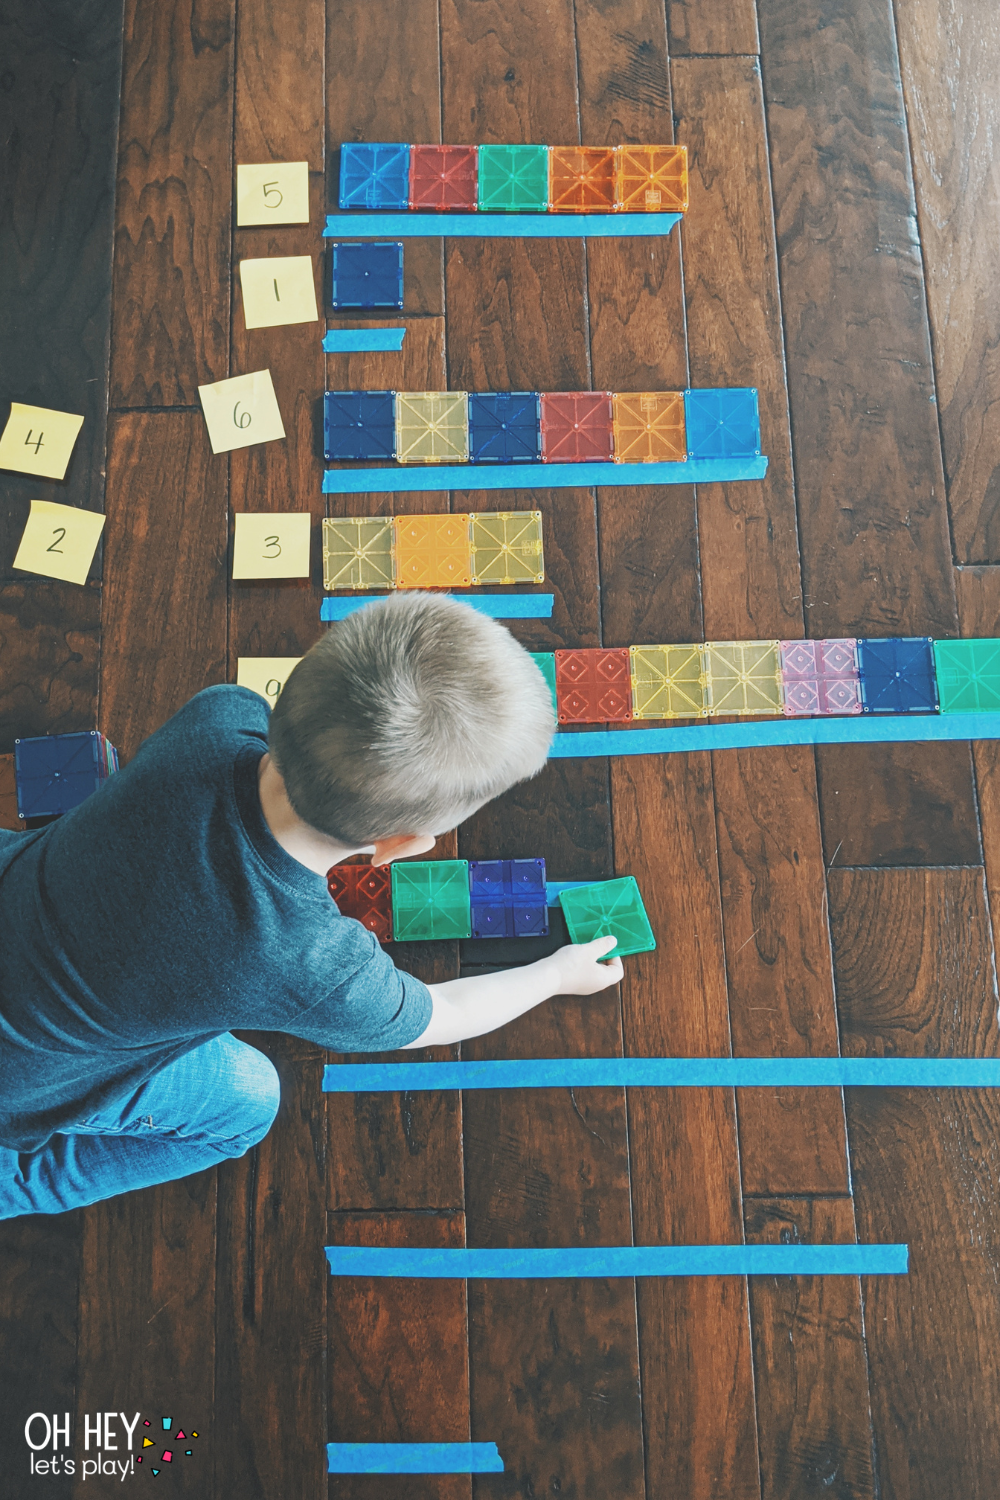
10) Measurement: Use magnetic tiles as a measuring tool to develop early math skills, counting, and vocabulary such as longer, shorter, longest, and shortest.
- Place several pieces of painter’s tape on the floor all different lengths. Let children use magnetic tiles to “measure” the different pieces of tape counting how many magnetic tiles it takes to cover each piece of tape.
- To extend the activity, write numbers on sticky notes and have children find the number for each measurement and stick it next to the piece of tape (ex: if the tape is 8 magnetic tiles long, they will find the sticky note with an ‘8’ on it and place it next to the coordinating piece of tape).
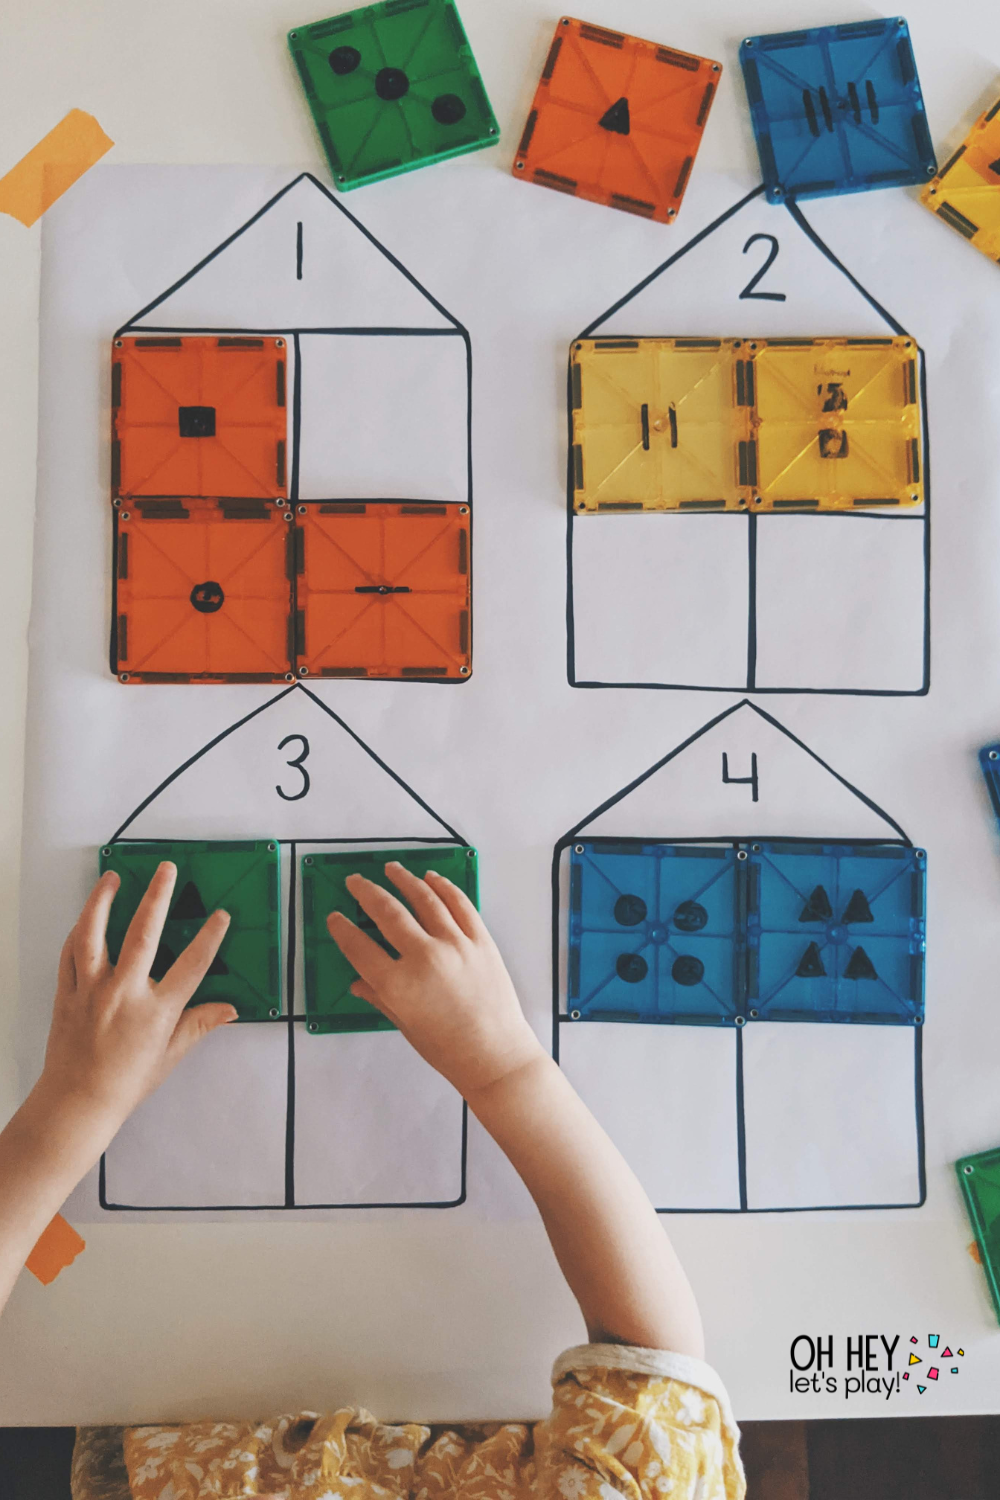
11) Solving Equations: Use magnetic tiles as a way to introduce simple equations and to build fluency with math facts.
- Introduce simple equations by using magnetic tiles as a math manipulative. For example, set out two red squares and one blue square, and have children connect them all to show how many squares there are all together.
- To build fluency with math facts, use square magnetic tiles and small triangles. Write addition, subtraction, or even multiplication facts on the squares using sticky notes, colored painter’s tape, or a dry erase marker. Write all the solutions to the equations on the small triangles. Have children solve the equations on the squares and connect the triangle with the coordinating solution to each one.


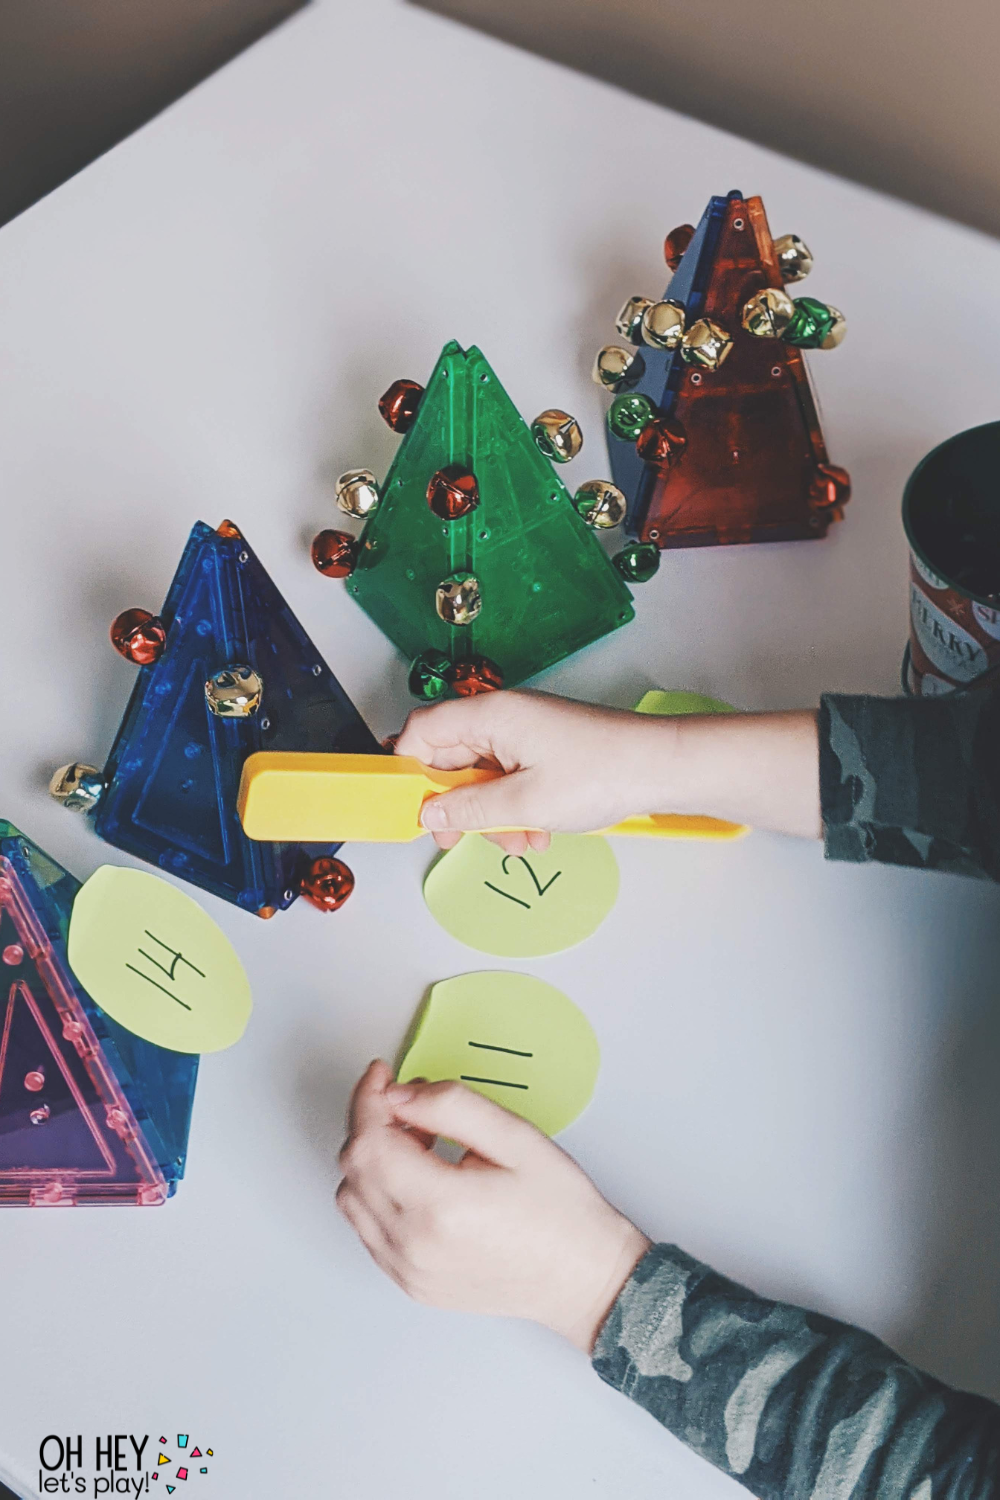
12) Science Exploration - Magnets: Use magnetic tiles to as a way to explore and discover magnetism.
- Use a magnetic wand and either magnetic colored bingo chips (or grab the wand and chips together), or some metal jingle bells to explore, play, and learn about the way magnets attract and repel. The jingle bells are really fun at Christmas time!

13) Science Exploration - Colors + Lights: Use magnetic tiles to explore light, colors, and reflections.
- Build a structure with different colored magnetic tiles, and leave a space to put a flashlight inside. Turn out the lights and see how the light reflects onto the walls as the light shines through different areas of the structure. Playing and exploring colors like this in the dark can be very calming for our sensory systems and help to eliminate overstimulation.
14) Fill the Shapes (Problem Solving): Use magnetic tiles to build problem-solving skills and develop spatial awareness while filling in different shapes.
- Create shapes with magnetic tiles on top of a large piece of paper and then trace only around the outside edge of the shape. You could also eliminate the tracing on paper, and use painter’s tape to outline the shapes on the floor. Remove the magnetic tiles and have children try to recreate your design by filling in the shapes with the tiles. They will need to determine which magnetic tiles and how many of each fit together to fill the outlined shapes.

15) Word Families: Use magnetic tiles as a way to practice decoding, reading, and sorting words from the same word family. A word family is a group of words that have the same pattern of letters and sounds. For example, the words “cat,” “rat,” “bat,” and “hat,” are all a part of the “-at” word family as they teach the “-at” pattern. Words within a word family will also be rhyming words.
- Choose 5 different word families, one for each short vowel sound (ex: “-at,” “-en,” “-ip,” “-ot,” and “-ub”). Write a handful of words from each word family on square magnetic tiles using sticky notes, colored painter’s tape, or a dry erase marker. Children can practice blending the sounds to read the words while connecting all the tiles that are in the same word family. There should be 5 rows of square tiles by the time they are finished. After completing all the rows, have them go back and read all the words!

16) Rhyming: Use magnetic tiles as a way to practice rhyming words.
- Use square magnetic tiles and small triangles. Write 3 letter CVC (consonant, vowel, consonant - ex: “cat,” “sit,” “bus,” etc.) words on the square tiles using sticky notes, colored painter’s tape, or a dry erase marker. Write a word that rhymes with each of them on the small triangles. Have children read the words on each square tile, and then find and connect the triangles that have the coordinating rhyming word.

17) Sight Words: Use magnetic tiles as a way to practice reading, recognizing, and spelling sight words. Sight words should not be introduced until a child has mastered all letters and letter sounds, and can blend sounds to read 3 letter CVC words like “cat,” “sit,” and/or “dog.”
- This first idea is intended to be used after the words have already been initially introduced and the child is working on reading and recognizing them more fluently. Write a handful of sight words on some square magnetic tiles using sticky notes, colored painter’s tape, or a dry erase marker. Write the same words on some small triangle tiles. Children can read the words and connect the triangles to the squares that have the matching words.
- Work on spelling sight words by writing one letter out at a time on the square magnetic tiles. Do this for a handful of different words and spread the tiles out/mix them up. Give your child a word, and have them find and connect the letters together to spell it.
Pictured below: “Oh Hey Let’s Play with WINTER-Themes!” (Available only during the winter season!)

18) Compound Words: Use magnetic tiles as a way to work on building compound words. Compound words are made up of two words that can also be words on their own (for example, “bedroom” is a compound word because “bed” is a word on its own, and so is “room”).
- Using sticky notes, colored painter’s tape, or a dry erase marker, write out a bunch of words on the square magnetic tiles. Choose words that when combined together, will make a new word (suggestions: “bed,” “room,” “butter,” “fly,” “jelly,” “bean,” “tooth,” “paste,” etc.). TIP: Try to choose words that can only be combined one way, for example, if you use “mail", “box” “bed,” and “room,” children may try to connect the words “mail” and “room” to create the word “mailroom.” Spread the single word tiles out and have children word to connect two squares that create a compound word.
19) Rows & Columns, Multiplication: Use magnetic tiles as a way to help older children understand the concept of multiplication with rows and columns.
- Write a handful of multiplication facts using numbers 1-5 (or more depending on how many magnetic tiles you have) on sticky notes or note cards. Have your child take one sticky note or note card at a time, and then use the magnetic tiles to arrange them in a way that shows how many rows and columns they would need to solve the equation. For example, if the problem reads “2x3,” children would need to create 3 rows of 2. They would connect two square magnetic tiles, three different times to show the problem, and then they can count them up to find the answer.
20) Number Order & ABC Order: Use magnetic tiles to help children learn number order, and ABC order.
- Write a series of numbers on the square magnetic tiles using sticky notes, colored painter’s tape, or a dry erase marker (ex: 1-10, 10-20, 1-20, etc.). Spread them out and mix them up, then have children work to connect them all in order starting with the first number in the series.
- Write all 26 letters of the alphabet, either uppercase or lowercase, onto the square magnetic tiles (one letter per tile) using sticky notes, colored painter’s tape, or a dry erase marker. Spread them out and mix them up, then have children work to connect them all in order starting with letter A.
** BONUS IDEA! **
21) Baby Play - Early Fine Motor Development: Use magnetic tiles to help promote early fine motor development for babies age 8 months+.
- Clean out and wash a large, empty, carton with a plastic cover. Use a box cutter to cut a slit in the lid of the container so that babies can take square tiles and/or small triangle tiles and drop them into the container through the slit in the lid. Not only will this promote fine motor skills, but it will also engage babies’ senses with the noises the tiles make as they are dropped in.

If you were ever on the fence about investing in a set of Magnatiles, I can assure you that it’s not a purchase you’d regret! I hope this post was helpful and inspired some playful learning ideas to incorporate in your home. If you want to save these ideas to come back to later, be sure to pin one of the photos to your Pinterest!